Water damage can be caused by a number of reasons. Some are more obvious than others, but all need to be dealt with quickly to minimize the damage and avoid long-term issues like mold growth.
The first step in Water Damage Restoration Utah is a property inspection to classify the water type and determine a restoration plan. This includes assessing moisture levels, identifying potential safety risks and determining labor requirements.
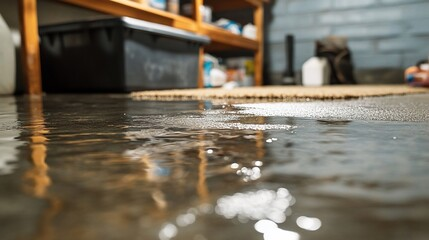
1. Remove the Water
The first step in water damage cleanup is to remove as much of the water as possible. This can be done with a wet/dry shop vacuum, towels, and commercial-grade dehumidifiers. This helps the space dry faster and reduces the risk of mold growth.
After the water is removed, it’s important to dehumidify the area and clean any affected materials and contents. This ensures that any bacteria, viruses, and fungus is killed and that the surfaces are safe for use.
Moisture can travel under floorboards and behind walls, so it’s important to use moisture meters and infrared thermal cameras to uncover any hidden pockets of saturation. Commercial-grade fans and dehumidifiers can then be used to remove any remaining moisture and bring the spaces back to their normal moisture levels.
Any items that can be saved should be moved to a safe location as soon as possible. This can help prevent any additional damage and protect the items from being lost or ruined by mold and mildew.
2. Dry It Out
Water restoration is a complex and time-consuming process that requires skill, training, and extensive knowledge of the properties of water. Whether it’s caused by natural disasters or plumbing mishaps, every situation demands a tailored approach to restore the property and mitigate long-term damage. By embracing proactive maintenance strategies and relying on expert services, you can safeguard your property against costly damage and restore it more effectively.
A primary goal of water damage restoration is to stop the influx of moisture and accurately assess the damage. This can be achieved by identifying the source of the water, removing all visible sources, and pumping out standing water. After the influx of water has been stopped, a wet/dry shop vacuum and dehumidifiers are used to remove remaining moisture and dry out areas affected by water damage. This step is essential because porous materials like carpet furniture and drywall can hold water even after appearing dry on the surface, resulting in foul orders and mold growth.
Additionally, the presence of water can also introduce contaminated pathogens that require proper cleaning and sanitization to prevent bacteria, viruses, and other hazards from entering living spaces. In order to work safely, it is important to disconnect any electrical sources and wear protective gear to prevent shocks or other life-threatening situations. It is also important to document any damages or losses, as this can help streamline insurance processes.
3. Remove Structural Components
After water damage, structural components like walls and floors are inspected for signs of water damage. If there is any, it’s important to remove them as soon as possible to avoid serious damage. This is also a good time to inspect appliances and other items that are close to water sources like plumbing, to ensure they are safe for use again.
This is another step in water damage restoration that should only be done by licensed professionals. They have the equipment and training to remove any items that are unsafe and may be prone to mold or structural damage. It’s also essential to note that the longer items remain in place, the more damage they will cause.
The structural drying process involves removing moisture from deep within building materials to prevent structural damage and other long-term problems. This is a very thorough process that requires the use of professional-grade tools.
Professionals begin the process by removing excess water using wet vacuums and extraction equipment. They then assess the amount of moisture present in building materials by measuring it with moisture meters. They also rely on air movers, dehumidifiers, and fans to expedite the drying process and ensure all pockets of moisture are eliminated. Visible signs of a successful structural drying process include stable temperature and humidity readings, a lack of musty odors, and no warping or deformation in affected materials.
4. Inspect the Area
The first step in water damage restoration involves inspection of the area by a professional. They will look for stains and mold, inspect for structural damage (cracked and warped foundation, walls, floors and ceilings), and test for moisture levels. They may also use a thermal-imaging camera that detects infrared energy and converts it into a visual image. This tool shows hot or cold spots hidden behind walls and allows the specialist to determine whether the leak is still active.
It’s important to turn off the electricity before entering an area with standing water, and if it’s safe to do so, to evacuate the area in case of sewage backup or severe flooding. This will reduce the risk of injury and minimize the need for costly repairs. It’s also a good idea to take photos and notes to support insurance claims.
Once the area has been inspected, the next steps in the process are water extraction, dehumidification, disinfection and drying of all materials that can’t be saved. This includes personal belongings, carpeting and other flooring, drywall (only the affected portions are removed), paneling, shelving, cabinets and other structures. Then comes the repair work, which can include everything from putting in new carpet to rebuilding walls and ceilings. Mold prevention or remediation is also often included in this stage, and all work is performed following strict safety protocols. Then, a final inspection is done to ensure that all work has been completed properly and completely.
5. Inspect the Foundation
Water damage restoration is a complex process that involves assessing the extent of the problem, removing standing water, cleaning and sanitizing affected areas, repairing damaged components and thoroughly drying out the area to prevent mold growth. It can be expensive, but neglecting it can lead to more serious structural damage and health risks for building occupants.
A well-maintained home foundation can help prevent water damage and reduce the risk of costly repairs. Having proper drainage and landscaping around your home is an important step to protect the foundation from moisture. It is also crucial to perform regular inspections of your foundation.
Signs of water damage in a home include cracks, especially long cracks that extend from the walls to the ceiling, slanting floors and warped walls. Other signs of foundation damage are a musty odor that lingers even after thorough cleaning and the presence of mold or mildew. These are all indicators that it is time to call a foundation repair specialist.
A shaky foundation can be caused by flooding, broken pipes, clogged toilets, dishwasher lines, sump pump failure or sewer backup. Having a faulty foundation can be a major issue for homeowners and affect the value of the property. Performing regular inspections can prevent foundation problems and costly repairs, so be sure to look for signs of water damage at your home. It is also important to understand the types of foundations, common issues, inspection processes and repair options.
6. Inspect the Electrical System
Water and electricity are a dangerous mix. When it infiltrates wiring, switches, outlets, and panels, it creates short circuits and arcs that can cause electrical fires and shocks. If left unchecked, the damage can corrode components and lead to additional problems in the future. Regular checks by a professional can prevent this problem from happening in the first place.
When water damage affects the electrical system, it must be addressed immediately. First, professionals will assess whether power should remain disconnected to protect people from exposure to shock hazards. They will then use thermal imaging and insulation resistance testing to identify deterioration and other damage that might not be apparent with visual inspection.
Damaged wires and components are then cleaned using specialized solvents to remove contaminants and prepare them for drying. Corrosion inhibitors may be used to reduce the risk of future problems. Restoration professionals will then test circuits and protection devices before restoring power.
While some components can be salvaged after water damage, others must be replaced entirely. This may include rewiring entire rooms or replacing major appliances like refrigerators and washing machines. As a result, the cost of repairing electrical damage caused by water damage can be more expensive than other types of repairs. However, acting quickly to address the damage can minimize costs. The longer water stays in the affected area, the more damage it causes.
Visit our Professional Services Blogs
Chris Atkins Lawncare, Atticus Landscaping, Treasure Coast Pressure Wash, Gulf Beach Plumbing, Marlborough Plumbing, Guns And Hoses Pressure Washing, Ambrose Construction, Coral Gables Pressure Washing, Willco Photography, Roofing Akron, Danalogsdon Roofing El Cajon, EC Siding Roofing Windows, Aurora Gutter, American Insurance Source, ECO, etdn, Denison Service League, Roofing Blog, Atlantic Vinyl Windows, Brookshires Fireplaces, JD Advanced Remodeling, Product Judgment, Master Dry Foundation Repair, Moe’s Hip, Elta Patio Paramount, Rock Around The Clock Festival, Learn, Play, Beyond, MoralesT Gardening, Car Window Tinting Perth, Duncan Carpentry, Gatestone Lighting, Mid Missouri Mold Inspections, Stucco Repair Albuquerque, Wausau Siding Hire, Munster Tree Care, Blue Granite Homes, Custom House, CENTRAL OS, Atlanta Pavers, Phillips Law Firm, Brent Ryder Masonry, Walker Construction Drywall Division, RJ Law, Caledon Plumbing, DDS Tech USA, Maine Mortgage Services, Inckpen, Seasons at Rose Creek, Cottonwood Place Dental, Cosmetic Laser 2000